上次写了Vue2.X 安装CKEditor5 以及基本使用(一),讲的官网提供的几种集成方案,可以快速使用,但是功能较少,而且难以扩展,这次讲使用源码集成方案。可以完全的自定义需要的功能
一.安装环境
- vue 2.6.11
- vue/cli 3.6.0(使用源码集成手脚架必须要3.x及以上版本)
二.安装
- 安装ckeditor基础框架、一些基础功能和主题
npm install --save @ckeditor/ckeditor5-vue2 @ckeditor/ckeditor5-dev-webpack-plugin @ckeditor/ckeditor5-dev-utils postcss-loader@3 raw-loader@0.5.1
npm install --save @ckeditor/ckeditor5-editor-classic @ckeditor/ckeditor5-essentials @ckeditor/ckeditor5-basic-styles @ckeditor/ckeditor5-link @ckeditor/ckeditor5-paragraph @ckeditor/ckeditor5-theme-lark @ckeditor/ckeditor5-heading
2.在vue.config.js配置相关信息,没有vue.config.js则在根目录(非src目录)下创建一个
const path = require('path');
const CKEditorWebpackPlugin = require('@ckeditor/ckeditor5-dev-webpack-plugin');
const {styles} = require('@ckeditor/ckeditor5-dev-utils');

module.exports = {


    // The source of CKEditor is encapsulated in ES6 modules. By default, the code
    // from the node_modules directory is not transpiled, so you must explicitly tell
    // the CLI tools to transpile JavaScript files in all ckeditor5-* modules.
    transpileDependencies: [
        /ckeditor5-[^/\\]+[/\\]src[/\\].+\.js$/,
    ],

    configureWebpack: {
        plugins: [
            // CKEditor needs its own plugin to be built using webpack.
            new CKEditorWebpackPlugin({
                // See https://ckeditor.com/docs/ckeditor5/latest/features/ui-language.html
                language: 'en',

                // Append translations to the file matching the `app` name.
                translationsOutputFile: /app/
            })
        ]
    },

    // Vue CLI would normally use its own loader to load .svg and .css files, however:
    //	1. The icons used by CKEditor must be loaded using raw-loader,
    //	2. The CSS used by CKEditor must be transpiled using PostCSS to load properly.
    chainWebpack: config => {
        // (1.) To handle editor icons, get the default rule for *.svg files first:
        const svgRule = config.module.rule('svg');

        // Then you can either:
        //
        // * clear all loaders for existing 'svg' rule:
        //
        //		svgRule.uses.clear();
        //
        // * or exclude ckeditor directory from node_modules:
        svgRule.exclude.add(path.join(__dirname, 'node_modules', '@ckeditor'));

        // Add an entry for *.svg files belonging to CKEditor. You can either:
        //
        // * modify the existing 'svg' rule:
        //
        //		svgRule.use( 'raw-loader' ).loader( 'raw-loader' );
        //
        // * or add a new one:
        config.module
            .rule('cke-svg')
            .test(/ckeditor5-[^/\\]+[/\\]theme[/\\]icons[/\\][^/\\]+\.svg$/)
            .use('raw-loader')
            .loader('raw-loader');

        // (2.) Transpile the .css files imported by the editor using PostCSS.
        // Make sure only the CSS belonging to ckeditor5-* packages is processed this way.
        config.module
            .rule('cke-css')
            .test(/ckeditor5-[^/\\]+[/\\].+\.css$/)
            .use('postcss-loader')
            .loader('postcss-loader')
            .tap(() => {
                return styles.getPostCssConfig({
                    themeImporter: {
                        themePath: require.resolve('@ckeditor/ckeditor5-theme-lark'),
                    },
                    minify: true
                });
            });
    },


    devServer: {
        host: '127.0.0.1',
        port: 9093,
        https: false,
        hotOnly: false,
        proxy: null, // 设置代理
        before: app => {
        }
    },
    // 第三方插件配置
    pluginOptions: {
        // ...
    }
}
- 在components目录下创建一个ykeditor.vue
<template>
  <div id="ykEditor">
    <ckeditor :editor="editor" v-model="editorData" :config="editorConfig"></ckeditor>
  </div>
</template>

<script>
import CKEditor from '@ckeditor/ckeditor5-vue2'
// ⚠️ NOTE: We don't use @ckeditor/ckeditor5-build-classic any more!
// Since we're building CKEditor from source, we use the source version of ClassicEditor.
import ClassicEditor from '@ckeditor/ckeditor5-editor-classic/src/classiceditor';

import EssentialsPlugin from '@ckeditor/ckeditor5-essentials/src/essentials';
import BoldPlugin from '@ckeditor/ckeditor5-basic-styles/src/bold';
import ItalicPlugin from '@ckeditor/ckeditor5-basic-styles/src/italic';
import LinkPlugin from '@ckeditor/ckeditor5-link/src/link';
import ParagraphPlugin from '@ckeditor/ckeditor5-paragraph/src/paragraph';
import Heading from '@ckeditor/ckeditor5-heading/src/heading';


export default {
  name: 'ykEditor',
  components: {
    // Use the <ckeditor> component in this view.
    ckeditor: CKEditor.component
  },
  data() {
    return {
      editor: ClassicEditor,
      editorData: '',
      editorConfig: {
        placeholder: '请填写内容',
        plugins: [
          EssentialsPlugin,
          BoldPlugin,
          ItalicPlugin,
          LinkPlugin,
          ParagraphPlugin,
          Heading,

        ],

        toolbar: {
          items: [
            'heading',
            '|',
            'bold',
            'italic',
            'link',
            'undo',
            'redo'
          ]
        },


        heading: {
          options: [
            {model: 'paragraph', title: 'Paragraph', class: 'ck-heading_paragraph'},
            {model: 'heading1', view: 'h1', title: 'Heading 1', class: 'ck-heading_heading1'},
            {model: 'heading2', view: 'h2', title: 'Heading 2', class: 'ck-heading_heading2'},
            {model: 'heading3', view: 'h3', title: 'Heading 3', class: 'ck-heading_heading3'}
          ]
        }
      }
    };
  }


}
</script>


<style>
  /*编辑框最低高度*/
  .ck-editor__editable{
    min-height: 400px;
  }
</style>
4,自定义扩展功能(全面)
功能列表有许多CKEditor提供的功能,点击名字就能查到对应的demo和详细的功能
以Font功能为例子(classic中没有的功能)
npm install --save @ckeditor/ckeditor5-font
导入需要的功能,然后在plugins,toolbar中配置上,有一些可以自定义的配置
<script>
import CKEditor from '@ckeditor/ckeditor5-vue2'
// ⚠️ NOTE: We don't use @ckeditor/ckeditor5-build-classic any more!
// Since we're building CKEditor from source, we use the source version of ClassicEditor.
import ClassicEditor from '@ckeditor/ckeditor5-editor-classic/src/classiceditor';

import EssentialsPlugin from '@ckeditor/ckeditor5-essentials/src/essentials';
import BoldPlugin from '@ckeditor/ckeditor5-basic-styles/src/bold';
import ItalicPlugin from '@ckeditor/ckeditor5-basic-styles/src/italic';
import LinkPlugin from '@ckeditor/ckeditor5-link/src/link';
import ParagraphPlugin from '@ckeditor/ckeditor5-paragraph/src/paragraph';
import Heading from '@ckeditor/ckeditor5-heading/src/heading';


import FontColor from '@ckeditor/ckeditor5-font/src/fontcolor';
import FontBackgroundColor from '@ckeditor/ckeditor5-font/src/fontbackgroundcolor';
import FontFamily from '@ckeditor/ckeditor5-font/src/fontfamily';
import FontSize from '@ckeditor/ckeditor5-font/src/fontsize';

export default {
  name: 'ykEditor',
  components: {
    // Use the <ckeditor> component in this view.
    ckeditor: CKEditor.component
  },
  data() {
    return {
      editor: ClassicEditor,
      editorData: '',
      editorConfig: {
        placeholder: '请填写内容',
        plugins: [
          EssentialsPlugin,
          BoldPlugin,
          ItalicPlugin,
          LinkPlugin,
          ParagraphPlugin,
          Heading,

          FontColor,
          FontBackgroundColor,
          FontFamily,
          FontSize,
        ],

        toolbar: {
          items: [
            'heading',
            '|',
            'bold',
            'italic',
            'link',
            '|',
            'fontFamily',
            'fontSize',
            'fontColor',
            'fontBackgroundColor',
            'undo',
            'redo'
          ]
        },

        //可以自定义配置
        heading: {
          options: [
            {model: 'paragraph', title: 'Paragraph', class: 'ck-heading_paragraph'},
            {model: 'heading1', view: 'h1', title: 'Heading 1', class: 'ck-heading_heading1'},
            {model: 'heading2', view: 'h2', title: 'Heading 2', class: 'ck-heading_heading2'},
            {model: 'heading3', view: 'h3', title: 'Heading 3', class: 'ck-heading_heading3'}
          ]
        },

        fontFamily: {
          options: [
            'default',
            'Ubuntu, Arial, sans-serif',
            'Ubuntu Mono, Courier New, Courier, monospace'
          ],
        },

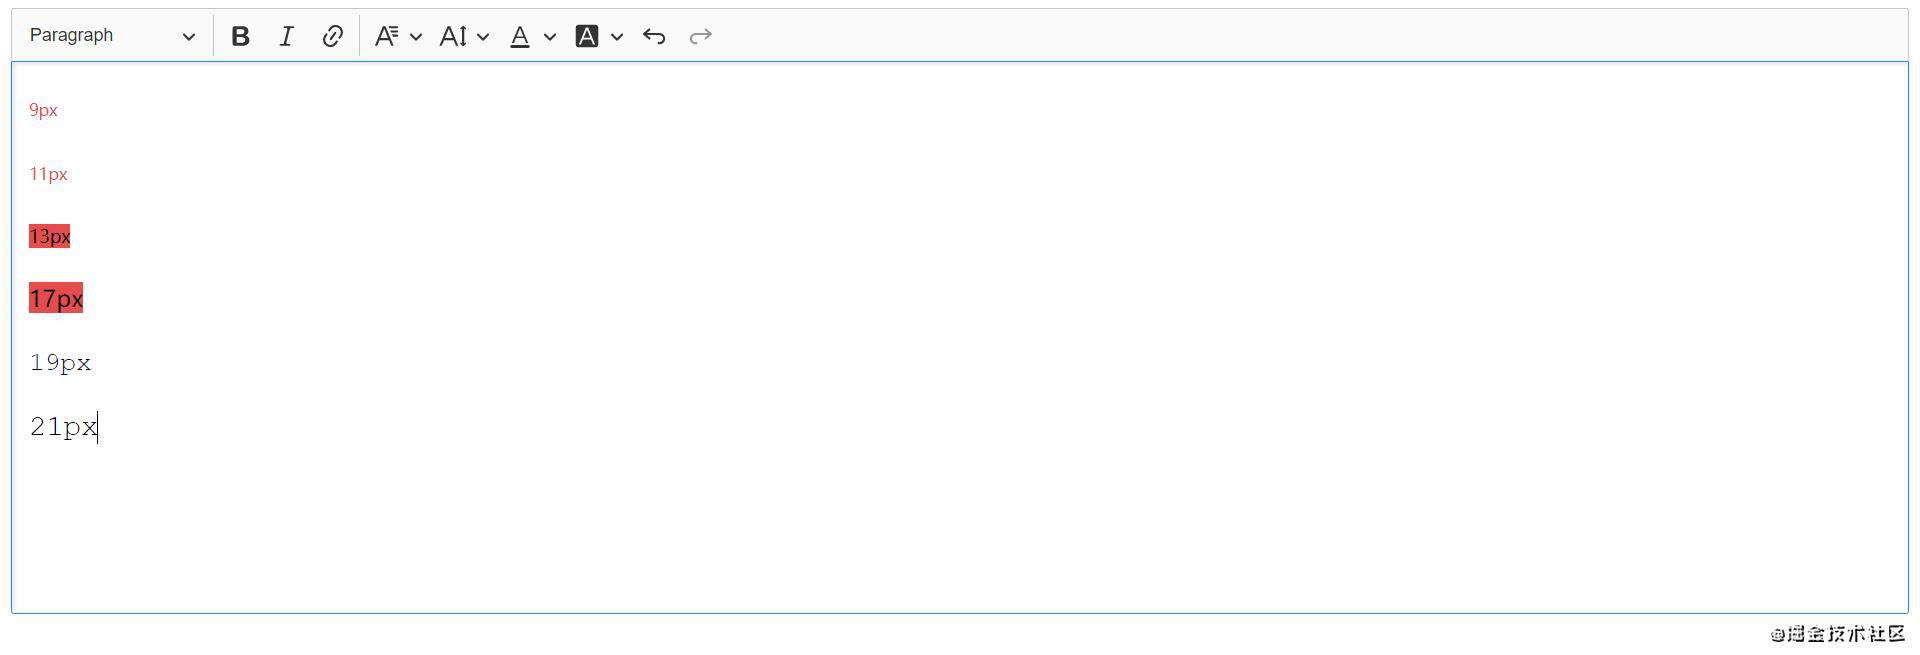
        fontSize: {
          options: [
            9,
            11,
            13,
            'default',
            17,
            19,
            21
          ],
          supportAllValues: true
        },

      }
    };
  }
}
</script>
5.使用
<template>
  <div id="app">
    <yk-editor></yk-editor>
  </div>
</template>

<script>

import ykEditor from "@/components/ykEditor";

export default {
  name: 'Home',
  components: {
    ykEditor
  }
}
</script>
效果图

三.结语
使用CKEditor的感受,读英文文档还是挺头疼的,半看半翻译,文档相对冗杂,感觉是要兼容旧版本的使用习惯,有点不上不下的。而且自定义的集成要求VueCli要3.x版本。如果不想这么多麻烦,还是推荐wangEditor更加的便捷,一个版本基本能覆盖大多数的使用场景。
这两个编辑器安装思路上也挺不同的。CKEditor的是你需要什么再自己安装什么。wangEditor则是全部都安装上你需要用什么再自己选。
常见问题FAQ
- 免费下载或者VIP会员专享资源能否直接商用?
- 本站所有资源版权均属于原作者所有,这里所提供资源均只能用于参考学习用,请勿直接商用。若由于商用引起版权纠纷,一切责任均由使用者承担。更多说明请参考 VIP介绍。
- 提示下载完但解压或打开不了?
- 找不到素材资源介绍文章里的示例图片?
- 模板不会安装或需要功能定制以及二次开发?


发表评论
还没有评论,快来抢沙发吧!